UAQ And UCQ Radio Enhancements (08-099-21)
Reference number: 08-099-21
Supersedes refnos: 08-003-22, 08-003-22 REV. A, 08-067-23, 08-067-23 REV. A
UAQ AND UCQ RADIO ENHANCEMENTS
TECHNICAL SERVICE BULLETIN
| CHRYSLER: | 2019 - 2023 (KL) Jeep Cherokee; 2018 - 2020 (WD) Dodge Durango; 2018 - 2021 (MP) Jeep Compass; 2019 - 2023 (BV) Jeep Renegade; 2018 - 2023 (LA) Dodge Challenger; 2018 - 2023 (LD) Dodge Charger; 2018 - 2023 (LX) Chrysler 300; 2018 -** 2023** (DS) RAM 1500 Pickup; 2018-2023 (JL) Jeep Wrangler; 2020 - 2023 (JT) Jeep Gladiator; 2018 (WK) Jeep Grand Cherokee; 2018 (BU) Jeep Renegade; 2018 (DJ) RAM 2500 Pickup; 2018 (D2) RAM 3500 Pickup; 2018 (DD) RAM 3500 Cab Chassis; 2018 (DF) RAM 3500 <10K Cab Chassis; 2018 (DP) RAM 4500/5500 Cab Chassis |
| GROUP: | 08 - Electrical |
VEHICLES AFFECTED
2019 - 2023 (KL) Jeep Cherokee
2018 - 2020 (WD) Dodge Durango
2018 - 2021 (MP) Jeep Compass
2019 - 2023 (BV) Jeep Renegade
2018 - 2023 (LA) Dodge Challenger
2018 - 2023 (LD) Dodge Charger
2018 - 2023 (LX) Chrysler 300
2018 -** 2023** (DS) RAM 1500 Pickup
2018 - 2023 (JL) Jeep Wrangler
2020 - 2023 (JT) Jeep Gladiator
2018 (WK) Jeep Grand Cherokee
2018 (BU) Jeep Renegade
2018 (DJ) RAM 2500 Pickup
2018 (D2) RAM 3500 Pickup
2018 (DD) RAM 3500 Cab Chassis
2018 (DF) RAM 3500 <10K Cab Chassis
2018 (DP) RAM 4500/5500 Cab Chassis
- **This bulletin applies to DS vehicles built on or before March 07, 2023 (MDH 0307XX).**
- This bulletin applies to JL and JT vehicles built on or before November 23, 2022 (MDH 1123XX).
- This bulletin applies to KL vehicles built on or before November 21, 2022 (MDH 1121XX).
- This bulletin applies to BV vehicles built on or before January 18, 2023 (MDH 0118XX) equipped with UAQ.
- This bulletin applies to BV vehicles built on or before January 26, 2023 (MDH 1126XX) equipped with UCQ.
- This bulletin applies to LA, LD and LX vehicles built on or before January 03, 2023 (MDH 0103XX).
CUSTOMER SYMPTOM
Customers may experience one or more of the following:
- Wi-Fi hotspot connection failure.
- Speaker popping, crackle noise during Voice Recognition (VR) response and navigation guidance.
- Mobile Station Integrated Services Digital Network (MSISDN) missing from radio, no connected services working.
- Intermittent, black radio display screen (Rear View Camera (RVC) not affected).
- Intermittent, radio freezes (RVC not affected).
- Wireless connectivity pairing and/or connection issues.
- Lost radio presets.
- Radio channels change by itself.
- SXM® icon inoperative.
- SXM® favorite song not displaying/playing.
- Incorrect navigation address/location/directions.
- Backup camera has black display screen or only displays "Check Entire Surroundings" with black screen (occurs when vehicle is shifted immediately to reverse upon key-on before RVC signal is received, recoverable with key cycle).
- High pitch chime noise.
- Contact list not loading.
- Device not supported message.
- Remote app inoperative.
- Travel-Link fuel price incorrect.
- Backup camera gridlines missing.
- Unable to adjust volume.
In addition, the following enhancement are included in this update:
- Enables map updates.
- Heavy Duty (HD) Truck USB HUB improvements.
- HD Truck heated steering wheel improvements.
CAUSE
Radio software
REPAIR SUMMARY
This bulletin involves inspecting and if required, updating the radio software level to 40.1. Depending on the radio's current software level the radio may need a one or two USB update.
CLAIMS DATA
| Labor Operation No: | Labor Description | Skill Category | Labor Time |
|---|---|---|---|
| 18-60-F2-95 | Radio, Software - Create USB Jump Drive From Uconnect Website (One Time Only) UAQ Radio 40.1 SW (0 - Introduction) | 6 - Electrical and Body Systems | 0.2 Hrs. |
| 18-60-F2-96 | Radio, Software - Create USB Jump Drive From Uconnect Website (One Time Only) UAQ Radio 28.3 SW (0 - Introduction) | 6 - Electrical and Body Systems | 0.2 Hrs. |
| 18-60-F2-97 | Radio, Software - Create USB Jump Drive From Uconnect Website (One Time Only) UCQ Radio 40.1 SW (0 - Introduction) | 6 - Electrical and Body Systems | 0.2 Hrs. |
| 18-60-F2-98 | Radio, Software - Create USB Jump Drive From Uconnect Website (One Time Only) UCQ Radio 28.3 SW (0 - Introduction) | 6 - Electrical and Body Systems | 0.2 Hrs. |
| 18-60-F2-99 | Radio, Inspect Software Level and Perform Software Update (One Step Update) (0 - Introduction) |
6 - Electrical and Body Systems | 0.7 Hrs. |
| 18-60-F2-9A | Radio, Inspect Software Level and Perform Software Update (Two Step Update) (0 - Introduction) |
6 - Electrical and Body Systems | 1.2 Hrs. |
| Failure code | CC | Customer Concern | |
The dealer must use failure code CC with this Technical Service Bulletin.
- If the customer's concern matches the SYMPTOM identified in the Technical Service Bulletin, failure code CC is to be used.
- When utilizing this failure code, the 3C's (customer's concern, cause and correction) must be provided for processing Technical Service Bulletin flash/reprogramming conditions.
DIAGNOSIS
Using a Scan Tool (wiTECH) with the appropriate Diagnostic Procedures available in DealerCONNECT/Service Library, verify all related systems are functioning as designed. If Diagnostic Trouble Codes (DTCs) or symptom conditions, other than the ones listed above are present, record the issues on the repair order and repair as necessary before proceeding further with this bulletin.
If the customer describes the symptom/condition listed above perform the Inspection Procedure.
INSPECTION
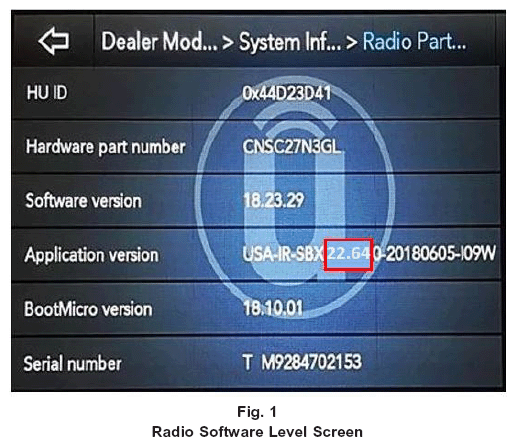
- Verify the radio software version. Radio must be in Dealer Mode to verify by following these steps:
- What is the current radio software level (Application Version)?
- 40.1 or higher >>> The radio software is already up to date. Normal diagnostics should be performed.
- At or above 22.64 and under 40.1 >>> The radio will only need one USB update. Proceed to Step 1
of the Repair Procedure.CAUTION: If this software is used on a radio with software level under 19.9, it could damage the radio. If the radio is damaged it may need to be replaced. Updating the radio directly from software level IR-19.9 to QR-40.1 will cause the radio to be damaged and it will need to be replaced. Always remember to properly perform the two step update if required. Start the two step update using 28.3 software.
- At or above 19.9 and under 22.64 >>> The radio will need two USB updates. Proceed to Step 1 of the Repair Procedure.
REPAIR PROCEDURE
- Using wiTECH create a Vehicle Scan Report and save a copy to the work order.
- Has a 4GB USB flash drive(s) been created?
- YES >>> Proceed to Step 9 .
- NO >>> Proceed to Step 3 .
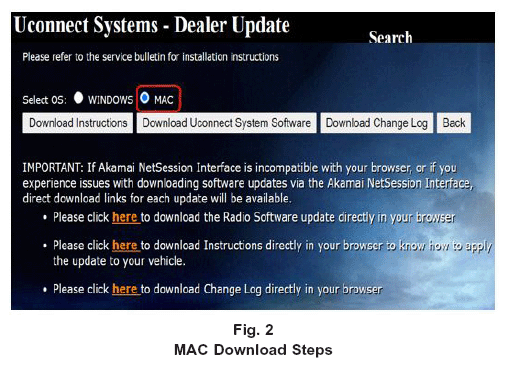
NOTE: When downloading the software file from the Uconnect site, always select the MAC version, regardless of the computer being used. - Go to DealerCONNECT>Service>Uconnect Command Center>Uconnect>More Information > Dealer software downloads to download the files.NOTE: If the software cannot be downloaded, make sure you have proper security access. If not, have the Service Manager or Shop Foreman download the software update.
- Use one blank USB flash drive with at least 4GB of space for each software update. Follow the on-screen instructions to download the software files.
- Download the software update file to your local PC's desktop. Make sure to select the "MAC" radial button for all downloads (Fig. 2)
.
- Be sure to download the file to your designated folder before extracting the zip file to the blank USB flash drive.NOTE: A blank USB flash drive will be needed for each radio update, additional updates cannot be on the same USB flash drive.
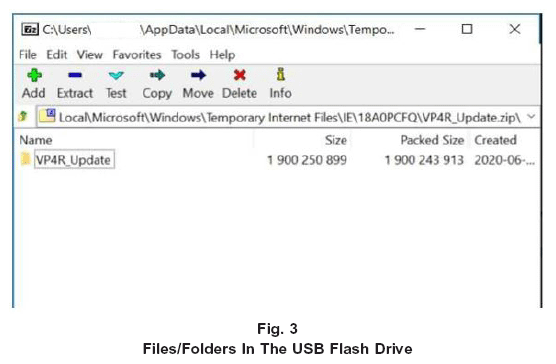
- Unzip the file to the root folder of USB flash drive. File should not be within a zip folder. Your USB file should look like (Fig. 3)
when you open it.
- Once the file is extracted to the USB flash drive, it's recommended to label the USB flash drive with the bulletin number and proper software level.NOTE: When performing a two step update, always start with 28.3 software.
- Start the vehicle and insert the correct USB flash drive with new software into the USB port.CAUTION: Make sure no other device is plugged into any of the USB ports while performing this update. If other devices are connected to USB ports during re-programming, it may cause failure of files to be loaded which may cause the radio to need replacement.
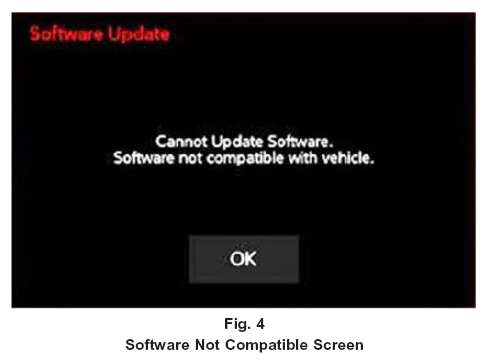
- If the screen in (Fig. 4)
is displayed, the USB flash drive was not set up correctly. Use a top name brand USB flash drive, like Kingston, create a new USB flash drive and start the update again.
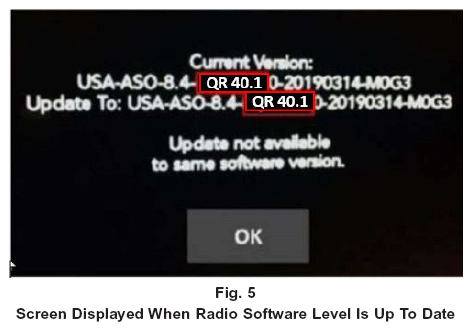
- If the radio software is already up to date, the screen in (Fig. 5)
will be displayed. Press "OK" and remove the USB flash drive.NOTE: If the ignition is turned off before the two minutes has expired, the software update will be canceled. The ignition does not have to be turned off to perform this updated. (Fig. 7) .
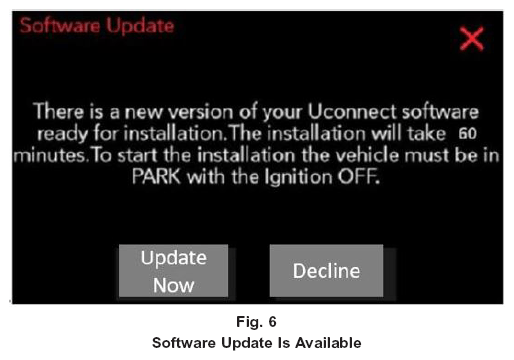
- Once the system has verified there is an available update, press the "Update Now" button. Make sure the vehicle is in park, DO NOT turn off the ignition (Fig. 6)
.
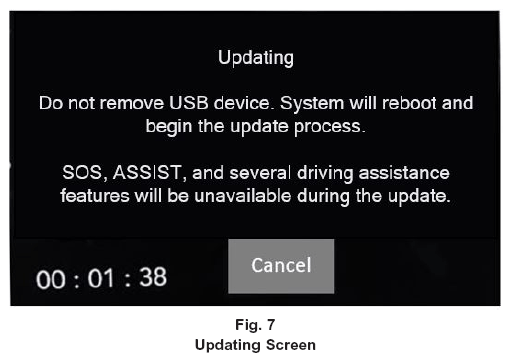
- When the radio starts updating, the screen in (Fig. 7)
will be displayed.
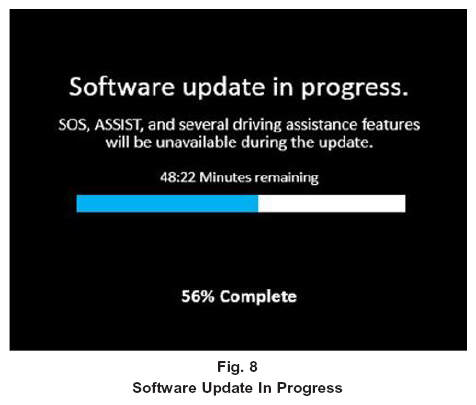
- The radio will reboot and the update will begin. The update should only take 25 minutes, the timer on the screen may display the incorrect time remaining, (Fig. 8)
.NOTE: The completion indicator may not reach 100%, even though the software update has been completed. Once the software update has finished, the radio and display screen will turn off.
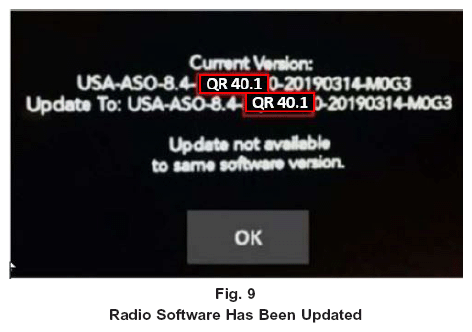
- After the update has completed, the radio will shut down. With the USB flash drive still inserted in the USB port, cycle the ignition back to the run position. If the radio software was updated correctly the "Current Version:" and the "Update To:" software levels in (Fig. 9)
will display the identical software level. Press "OK" and remove the USB flash drive.
- What is the current radio software level?
- 28.3 >>> Radio still need one more USB flash drive update. Proceed to Step 1 .
- 40.1 >>> Radio update is complete. Proceed to Step 17 .
- Cycle off the ignition, open and close the driver door and let all modules go into a sleep mode.
- Check if the navigation is working properly by pressing the 'Nav' button on the bottom tool bar. Verify the navigation map loads properly.
- If the radio or navigation software didn't update properly or the navigation map doesn't load, attempt the software update one more time. If the software doesn't update properly or the navigation doesn't work, the radio may need to be replaced.
- Using wiTECH, clear all DTCs that may have been set in any module due to reprogramming.
- Using wiTECH create another Vehicle Scan Report and save a copy to the work order.
POLICY
Reimbursable within the provisions of the warranty.