Radio And Back-Up Camera Enhancements (08-101-17)
WARNING: This page is about the Charger GT, which is a different variant/trim than selected.
Publication date: 2021-01-29Reference number: 08-101-17
Supersedes refnos: 08-012-18, 08-012-18 REV. B, 08-012-18 REV. C, 08-012-18 REV. D, 08-017-21, 08-084-19, 08-084-19 REV. A
RADIO AND BACK-UP CAMERA ENHANCEMENTS
TECHNICAL SERVICE BULLETIN
Reference Number(s): 08-017-21, Date of Issue:
January 29, 2021
Superceded Bulletin(s): 08-084-19 REV. A, Date of Issue:
August 20, 2021
| CHRYSLER: | 2018 (JL) Jeep Wrangler, (RU) Chrysler Pacifica, (LA) Dodge Challenger, (LD) Dodge Charger, (WD) Dodge Durango, (WK) Jeep Grand Cherokee |
| GROUP: | 08 - Electrical |
NOTE:
This bulletin supersedes Technical Service Bulletin (TSB) 08-084-19 REV. A, date of issue August 20, 2021, which should be removed from your files. All revisions are highlighted with **asterisks** and include software level, sales codes, symptom/conditions and LOPs.
This Service Bulletin is also being released as Rapid Response Transmittal (RRT) 18-030. All applicable Sold and Un-Sold RRT VINs have been loaded. To verify this RRT service action is applicable to the vehicle, use VIP or perform a VIN search in DealerCONNECT/Service Library. All repairs are reimbursable within the provisions of warranty.
This Service Bulletin is also being released as Rapid Response Transmittal (RRT) 18-030. All applicable Sold and Un-Sold RRT VINs have been loaded. To verify this RRT service action is applicable to the vehicle, use VIP or perform a VIN search in DealerCONNECT/Service Library. All repairs are reimbursable within the provisions of warranty.
OVERVIEW
This bulletin involves updating the radio software level to **1848.34.**
MODELS
MODELS CHART
| 2018 | (JL) | Jeep Wrangler |
| 2018 | (RU) | Chrysler Pacifica |
| 2018 | (LA) | Dodge Challenger |
| 2018 | (LD) | Dodge Charger |
| 2018 | (WD) | Dodge Durango |
| 2018 | (WK) | Jeep Grand Cherokee |
NOTE:
This bulletin applies to vehicles within the following markets/countries: North America, APAC, EMEA and LATAM.
NOTE:
This bulletin applies to vehicles equipped with one of the following radios:
- Uconnect 3 with 5" Display (Sales Codes **ULA, UMA,** UAA, UCA, UDA, UGA or UJA).
- Uconnect 4 with 7" Display (Sales Codes UAG, UGG, UJG, ULG, UMG, UDG or UCG).
- **Uconnect 4 with 8.4" Display (Sales Codes UAM, UCM, UDM, UGM or UJM).**
SYMPTOM/CONDITION
Customers may experience one or more of the following:
- **Radio display screen flickers.
- Clock loses 6 seconds per day (JL with 5 inch screen).**
- Green horizontal lines on back up display, in reverse (If this is the customer concern use camera LOP 18-60-02-Y7, on JL vehicles only).
- Ghost Touch, features, modes and App's changing, without drivers input.
- Speaker pop noise when using Bluetooth® device.
- When vehicle is first started the radio will reset and the time display shows 12:00.
- Audio distortion and volume fluctuation.
- Blank rear camera image in reverse (If this is the customer concern use camera LOP 18-60-02-Y7 on JL vehicles only).
- Audio cutting in and out during memory recall.
- Ring tone too loud.
- AM/FM volume fluctuates.
- While in CarPlay® or AndroidAuto,® Google® maps showing wrong location.
- Phone disconnected after first call.
- Black screen or White screen with vertical lines.
- PIN clear and volume locked while KeySense is used.
- Audio static while in SXM/SAT modes.
- Echo heard during Bluetooth phone calls.
- The radio is locked up.
- The radio remains on after ignition has been turned off.
- The radio resets.
- The radio screen turns black.
- The radio screen shows messages "Software Update" or "Reinsert USB Device" and displays that screen in a continuous loop.
DIAGNOSIS
Using a Scan Tool (wiTECH) with the appropriate Diagnostic Procedures available in DealerCONNECT/Service Library, verify all related systems are functioning as designed. If Diagnostic Trouble Codes (DTCs) or symptom conditions, other than the ones listed above are present, record the issues on the repair order and repair as necessary before proceeding further with this bulletin.
If the customer describes the symptom/condition listed above perform the Repair Procedure.
REPAIR PROCEDURE
NOTE:
An 8 GB USB flash drive is required for this update. It is also recommended to use a quality, name brand (Kingston®) flash drive over a generic USB flash drive.
- Has a 8 GB
USB flash drive been created?
- YES >>> Proceed to Step 11 .
- NO >>> Proceed to Step 2 .
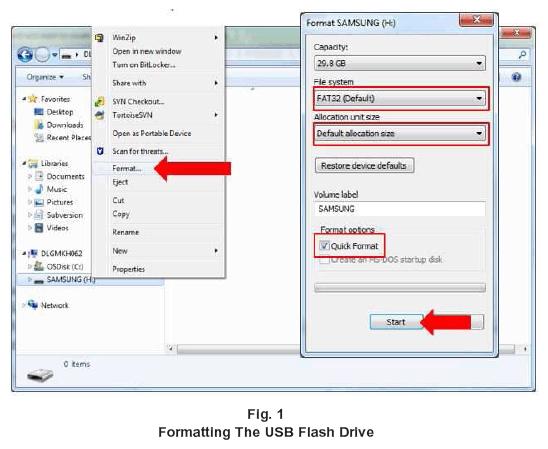
- Perform the following steps to format the USB flash drive (Fig. 1)
.
- Select "FAT32" format.
- Select "Default allocation size" under Allocation Unit Size.
- Select "Quick Format" under Format Options.
- Click "Start".
- Go to DealerCONNECT>Service>Uconnect Command Center>Uconnect>More Information >Dealer software downloads to download the files.
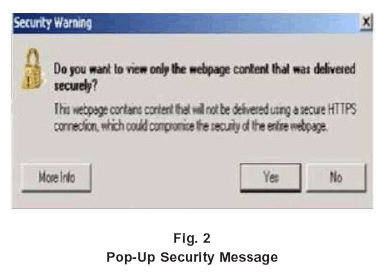
- If a security message appears "Do you want to view only the web page content that was delivered securely?" (Fig. 2)
. Press "No" to continue.NOTE: If the software cannot be downloaded, make sure you have proper security access. If not, have the Service Manager or Shop Foreman download the software update.
- Use a blank USB flash drive with at least 8 GB of space. Follow the on-screen instructions to download the software files.
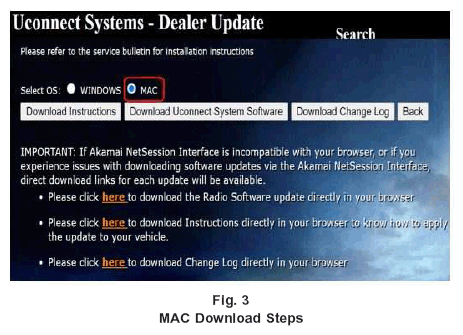
- Download the software update file to your local PC's desktop. Make sure to select the "MAC" radial button for all downloads (Fig. 3)
.
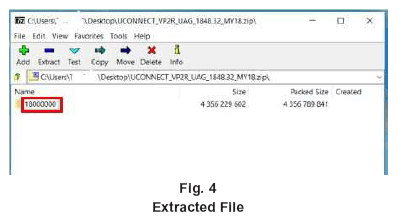
- Be sure to download the file to your PC's desktop and open it (Fig. 4)
.NOTE: The USB should only contain a folder labeled "18000000" on it after files are extracted to it.
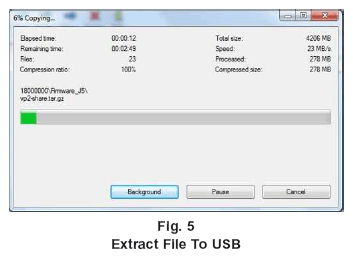
- Extract the downloaded file to the USB flash drive (Fig. 5)
.NOTE: It may take a few minutes for an accurate extract time to be displayed.
- Once the file is extracted to the USB flash drive flash drive, it is recommended to label the USB flash drive with the bulletin number and proper radio Sales Code.CAUTION: Eject the USB flash drive properly from your PC. Failure to eject the USB flash drive properly may result in an improper file byte size and cause the update to not fully download.
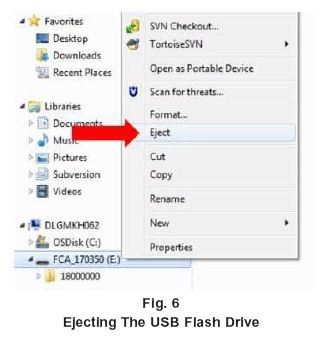
- Perform the following steps to properly eject the USB flash drive (Fig. 6)
:
- Right click on the location of the USB flash drive.
- Click "Eject" to avoid data corruption.
- Remove the USB flash drive from the PC.
NOTE: Verify the vehicle fuel level is at least 1/8 of a tank. If not, add fuel as required. If necessary, take vehicle out of ship mode and enter customer mode. - Shut off all remaining accessories for the duration of the update (flashers, climate controls, etc.).
- Wait for the radio to fully power on and initialize. Ensure all splash, partner logo, animation, disclaimer and main screens have loaded, before starting the software update.CAUTION: Ensure no other device is plugged into any of the USB ports while performing this update. If other devices are connected to the USB ports during the update, it may cause failure of files to be loaded. Failure to do so may cause the radio to need replacement.NOTE: The engine must be running and radio powered on during the update. Failure to do so may result in the radio not being updated and create connectivity issues. DO NOT remove the USB flash drive during the update.
- Start the vehicle and insert the USB flash drive into the USB port.
- Wait for the software update pop-up window to appear on the screen.NOTE: There can be more than one older current software level depending on vehicle/radio manufacture time of build.
- Verify the screen states the following: "Current: 18XX.XX Update to: **1848.34** Approx time: 30 minutes". Is the radio current software level at or higher than **1848.34?**
- YES >>> The radio software is already up to date. Press "Cancel" to exit. Normal diagnostics should be performed.
- NO >>> The radio software needs to be updated. Proceed to Step 16 .
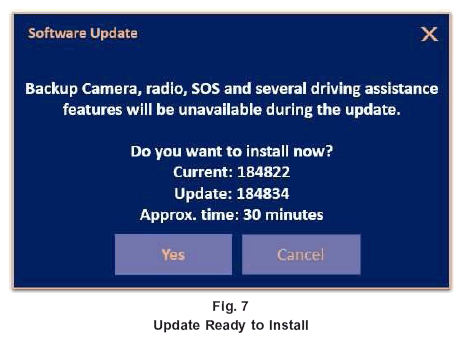
NOTE: During the first 30 seconds of the software update, the current software is erased. The radio will then re-boot and re-start to begin the update of the software. Many software partitions are displayed on the screen during the update process. - Press "Yes" to start the update. The software update takes approximately 30 minutes to complete (Fig. 7)
.
- Did the update fail after insertion of the USB flash drive into the USB port?
- YES >>> For LD and LA vehicles proceed to Step 18 . For all other vehicles, proceed to Step 19 .
- NO >>> Proceed to Step 20 .
NOTE: If the updated failed perform the following steps on LA and LD vehicles. - Leave the USB flash drive inserted in the USB port and perform the following:
- Shut the vehicle off.
- Remove fuse F37 from the Power Distribution Center (PDC). The PDC is located in the trunk on the right-hand side of the vehicle.
- Wait five minutes. Re-insert fuse, start the vehicle and re-start update procedure at Step 12 .
NOTE: If the updated failed perform the following steps on WD, WK, RU and JL vehicles.NOTE: If the vehicle is equipped with Engine Stop/Start (ESS), make sure to disconnect the main 12V battery and the auxiliary 12V battery. - Shut the vehicle off and perform the following:
- Disconnect the battery(ies).
- Wait two minutes to ensure a full power down sequence.
- Connect the battery(ies) and re-start the update procedure at Step 12 .
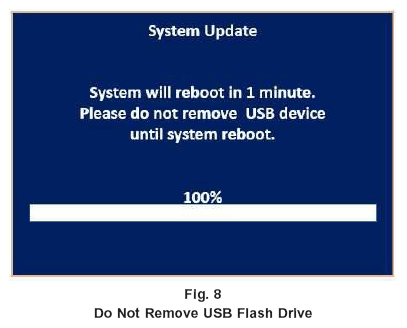
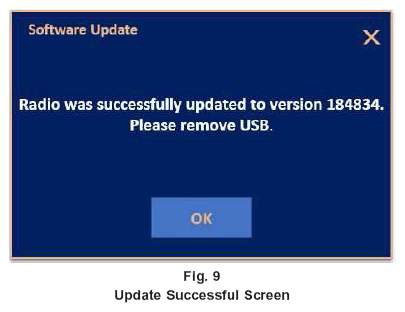
NOTE: Do not remove the USB flash drive before you are instructed to (Fig. 8) . - Wait for the "Radio was successfully updated" screen (Fig. 9)
.
- Wait until radio resets and audio is heard before removing the USB flash drive!
- Verify the software version is 1848.34 by re-inserting the USB flash drive into the USB port. Did the Software Update pop-up again, displaying the following: "Current: 1848.34 Update to: 1848.34 Update not available to same software version"?
- YES >>> The software update is complete, press "Cancel" then remove the USB flash drive from the USB port.
- NO >>> Verify the file sizes on the USB flash drive to ensure they are correct and then attempt the update again. Re-start at Step 12 .
POLICY
Reimbursable within the provisions of the warranty.
NOTE:
If the customer concern was "Blank rear camera image in reverse" and the vehicle is a 2018 JL, use LOP 18-60-02-Y7. For all other symptom and vehicles the radio LOP must be used. The dealer can not use both LOPs.
TIME ALLOWANCE
TIME ALLOWANCE CHART
| Labor Operation No: | Description | Skill Category | Amount |
|---|---|---|---|
| 18-60-02-Y7 Backup Camera LOP (JL Only) |
Radio, Check Software Level and Perform Software Update Backup Camera LOP (0 - Introduction) |
6 - Electrical and Body Systems | 0.5 Hrs. |
| **18-60-02-CF | Radio, Software - Create USB Jump Drive From Uconnect Website (One Time Only) (0 - Introduction) |
6 - Electrical and Body Systems | 0.4 Hrs. |
| 18-60-02-CH | Radio, Check Software Level and Perform Software Update (Sales Codes UMA, UKA, UAA, UCA, UDA, UJA, UGA Only) Radio LOP (0 - Introduction) |
6 - Electrical and Body Systems | 0.9 Hrs. |
| 18-60-02-CG | Radio, Check Software Level and Perform Software Update (All Other Radios listed on This Bulletin) Radio LOP (0 - Introduction) |
6 - Electrical and Body Systems | 0.5 Hrs.** |
NOTE:
The "One Time Only" LOP is used one time per dealer when downloading the software onto a USB flash drive. The dealer can only use the download LOP, one time for each of the radios listed.
FAILURE CODE
**The dealer must use failure code CC with this Service Bulletin.
- If the customer's concern matches the SYMPTOM/CONDITION identified in the Service Bulletin, failure code CC is to be used.
- When utilizing this failure code, the 3C's (customer's concern, cause and correction) must be provided for processing Service Bulletin flash/reprogramming conditions.**
FAILURE CODE CHART
| CC | Customer Concern |