Internal Heat EXCHANGER
- If removed, install the A/C pressure transducer onto the A/C liquid line. Refer to TRANSDUCER, A/C PRESSURE, INSTALLATION .
- Position the Internal Heat Exchanger (IHX) into the engine compartment.
- Remove the tape or plugs from the line fittings and the ports in the A/C expansion valve.
- Lubricate a new dual plane seal with clean refrigerant oil and install it onto the suction and liquid line fittings. Use only the specified seal as it is made of a special material for the specific refrigerant in the system. Use only refrigerant oil of the type recommended for the A/C compressor in the vehicle.
- Connect the IHX to the A/C expansion valve.
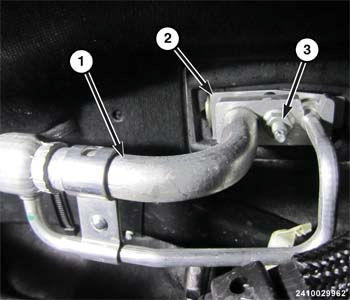
- Install the nut (3) that secures the IHX (1) to the A/C expansion valve (2) and tighten to the proper torque specifications. Refer to TORQUE SPECIFICATIONS .
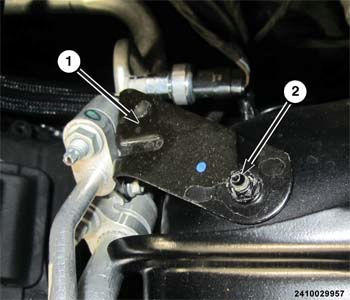
- Install the nut (2) that secures the refrigerant line mounting bracket (1) to the left front shock tower and tighten to the proper torque specifications. Refer to TORQUE SPECIFICATIONS .
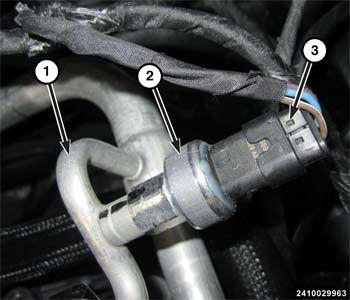
- Connect the wire harness (3) to the A/C pressure transducer (2).
- Remove the tape or plugs from the fittings that connect the suction and liquid lines to the IHX.
- Lubricate a new dual plane seal with clean refrigerant oil and install it onto the liquid line fitting. Use only the specified seal as it is made of a special material for the specific refrigerant in the system. Use only refrigerant oil of the type recommended for the A/C compressor in the vehicle.
- Connect the suction and liquid lines to the IHX.
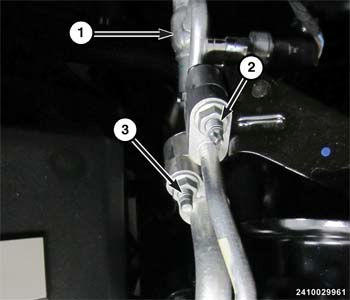
- Install the nuts (2 and 3) that secure the suction and liquid lines to the IHX and tighten to the proper torque specifications. Refer to TORQUE SPECIFICATIONS .
- Install the air cleaner housing. Refer to BODY, AIR CLEANER, INSTALLATION .
- Connect the negative battery cable. If equipped with an Intelligent Battery Sensor (IBS), connect the IBS connector.
- Evacuate the refrigerant system. Refer to PLUMBING, STANDARD PROCEDURE .
- Adjust the refrigerant oil level. Refer to OIL, REFRIGERANT, STANDARD PROCEDURE .
- Charge the refrigerant system. Refer to PLUMBING, STANDARD PROCEDURE .